Go back to surfing session

Subscribe to our feed!

Remove unnecessary links

August 30, 2009

Why remove unncessary links ?
Google Webmasters Guidelines tell us to don`t use more than 100 links on a single page.
Offer a site map to your users with links that point to the important parts of your site. If the site map is larger than 100 or so links, you may want to break the site map into separate pages.
Keep the links on a given page to a reasonable number (fewer than 100).
Whats are the risks of using more than 100 links on a single page?
By using more than 100 links you get a very small risk of getting black flagged or banned by google. The 100 links limit is more just a guideline, lots of high PR websites are using well beyond 100 links, but I think it`s better to listen to Google`s tips so if you have decided to remove some links read this post to see how to remove the links from labels and from timestamps.
remove unnecessary links


#1 How to remove labels links ?
The easiest way to remove the labels links is to remove labels, but you can use the labels as keywords. Write your primary keywords of a post in
labels. Complete the bellow steps to remove only the links so we will have a simple text as labels. This method can drastically reduce the number of links.

1. Log in to Blogger and go to Layout >>> Edit HTML and check the Expand Widget Templates checkbox

2. Find the following code:
<span class='post-labels'>
<b:if cond='data:post.labels'>
<data:postLabelsLabel/>
<b:loop values='data:post.labels' var='label'>
<a expr:href='data:label.url' rel='tag'><data:label.name/></a><b:if cond='data:label.isLast != &quot;true&quot;'>,</b:if>
</b:loop>
</b:if>
</span>
If you use Firefox press Ctrl + F and type some keywords from the above code in the search form to find the code easier. Here is an image from my test blog template code:
timestamp link


3. Remove the red marked pieces of code from the above code and save your template.

#2 How to remove timestamp link ?
Like at the labels you can simply remove the timestamp at all:

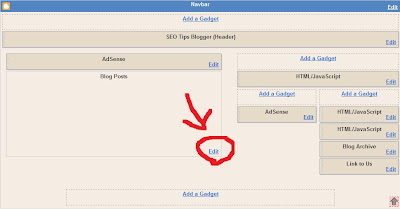
To totally remove the timestamp go to Layout , Page Elements , click on the Edit button from the Blog posts box and uncheck third checkbox:


This was the easiest way ,i have do the same for my blog, i think the timestamp is useles here is how to remove only the link so to have the timestamp as a simple text for those blogger who want to keep the timestamp:

1. Log in to Blogger and go to Layout >>> Edit HTML and check the Expand Widget Templatescheckbox

2. Find the following code:
<a class='timestamp-link' expr:href='data:post.url' rel='bookmark' title='permanent link'><abbr class='published' expr:title='data:post.timestampISO8601'><data:post.timestamp/></abbr></a>
You code may be a little different but, here is an image from my test blog template to help you:
100 links limit


3. Remove the red marked piece of code and save your template!
Related tutorials:
First please read and complete all the steps from my previous tutorial about How to add a second sidebar to blogger. I think the title of this post is explaining about what is this tutorial . We will place one of the sidebar to the other side of the blog. At the end if you will follow all steps with attention your Page Elements will look like this:
second sidebar left and right
Now let`s start , we need to edit the code of the template so:

1. Go to Layout >>> Edit HTML

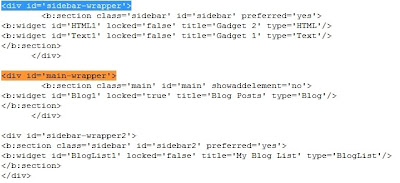
2. Find the following code:
<div id='sidebar-wrapper'>
<b:section class='sidebar' id='sidebar' preferred='yes'>
<b:widget id='HTML1' locked='false' title='Gadget 2' type='HTML'/>
<b:widget id='Text1' locked='false' title='Gadget 1' type='Text'/>
</b:section>
</div>
Look only for the code what i have highlighted with red , the other codelines are the gadgets inside the sidebar.

3. Find the following code:
<div id='main-wrapper'> <b:section class='main' id='main' showaddelement='no'> <b:widget id='Blog1' locked='true' title='Blog Posts' type='Blog'/> </b:section> </div>
4. Cut and Paste the code from step #2 right before the code from step #3, it will look like this just you may have other gadgets:
how to place second sidebar to the other side


5. Now we need to edit the CSS code of the template:

Find the following code:
#sidebar-wrapper { width: 220px; float: $endSide; word-wrap: break-word; overflow: hidden; }
Your code may have different width so look for the code what i have marked with blue. Change the red marked code from $endSide to $startSide

6. Save your template
Related tutorials:
Most of your blog readers are only reading your blog without commenting. The problem is that just a very little amount of readers are contributing. With good techniques you can increase the amount of contributing members. Encourage your visitors to leave comments on your blog:

1. Make commenting easy - Your visitors may want to leave comments but if they don`t know how to or just they are too lazy to comment if it`s to hard. Allow anonymous comments, place the comment form bellow posts, and remove the word verification.
  • To place the comment form bellow posts go to Settings , Comments and select the Embedded bellow posts option at Comment Form Placement.
  • Select the Anyone option at Wo Can Comment? to allow anonymous comments.
  • Select No at Show Word Verification for Comments? to remove the word verification.
2. Make your blog DoFollow - Your visitors will leave comments to build backlinks for they own blog. If your blog is Dofollow every comment is a backlink for the reader who posted the comment, but be carefull cause some unwanted visitors will try to SPAM your blog with bad quality comments to create backlinks.

3. Ask them - Ask your visitors to comment, ask them to share they opinion and suggestions. Place questions on your posts and talk with your visitors , be active and they willl follow you.

4. Respond to comments - Respond to comments , talk with your visitors to create a community. Try to respond fast as it`s possible to all the questions they ask. If they ask something you don`t know say what you think about it and ask them to share they view.

5. Comment on other blogs - Demonstrate to your visitors that your are active on other blogs. By commenting on other blogs you will get more backlinks and maybe the owners of the other blogs will leave comments on your blog.

Thanks for reading my posts and please contribute to our community by posting a comment !
Related tutorials:

How to check your backlinks

August 20, 2009

First read my post about backlinks and how important are them for a well SE Optimized page.Check your progress on building backlinks is not important from SEO perspective but it`s i good to know the number of your backlinks. Find out the number of your backlinks (or the backlinks od your rivals) using the following free online SEO tools and services:

1. SmartPageRank Backlinks Pagerank Checker
This tool can check the PageRank of your backlinks, the anchor text and if its DO- or No- follow.

This tool is allmost the same as the above one but this will check the PageRank of the Homepage of your backlinks and the number of pages where your backlinks are linking (Outbounding Links)

3. Google Webmaster toolsSign in to your Webmaster account and find the Links to your site page where is a list of your pages. After every page is the number of backlinks it has, click on a number to see the backlinks of that page.

NOTE: Check your backlinks with and without www. With these tools you can check the backlinks of each individual page. Keep building...TIPS: Check the backlinks of your competitors ,try to get link from the same pages as they.
Related tutorials:

How to remove / hide blogger navbar

August 16, 2009

blogger navbar The blogger navbar is on the top of every Blogger hosted blog. The Blogger support say`s the navbar can be removed only on FTP hosted blogs:

Unless you publish your blog via FTP, the Navbar cannot be disabled.

Why remove blogger navbar ?
  • Without the navigation bar your blog will look more professional and you will have a little more space. This is the main reason.

  • Why keep blogger navbar ?
  • If you keep the navigation bar your blog will receive a small amount of traffic from the "Next Blog" button.
  • If you remove the blogger navbar do it on your own risk , it`s breaking the TOS (Terms of Service) of Blogger, your blog can be banned , it`s true i have never heard about banned blogs from this reason.
  • To remove or hide the blogger navbar follow the bellow steps:

    1. Go to your blogger dashboard

    2. Go to Layout , Edit HTML

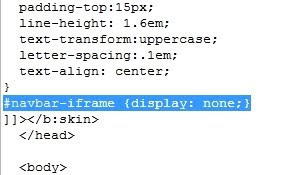
    3. Now we need just to insert a short CSS code in the blog template. Place the following code somewhere between <b:skin><![CDATA[/* and ]]>

    #navbar-iframe {display: none;}

    Like here:


    4. Save your template ,if you have followed the above steps the navbar will not be visible.
    Related tutorials:

    Privacy Policy for seo-tips-blogger.blogspot.com


    If you require any more information or have any questions about our privacy policy, please feel free to contact us by email at coolboycsaba@gmail.com.


    At seo-tips-blogger.blogspot.com, the privacy of our visitors is of extreme importance to us. This privacy policy document outlines the types of personal information is received and collected by seo-tips-blogger.blogspot.com and how it is used.


    Log Files
    Like many other Web sites, seo-tips-blogger.blogspot.com makes use of log files. The information inside the log files includes internet protocol ( IP ) addresses, type of browser, Internet Service Provider ( ISP ), date/time stamp, referring/exit pages, and number of clicks to analyze trends, administer the site, track user’s movement around the site, and gather demographic information. IP addresses, and other such information are not linked to any information that is personally identifiable.


    Cookies and Web Beacons
    seo-tips-blogger.blogspot.com does not use cookies.


    DoubleClick DART Cookie


    .:: Google, as a third party vendor, uses cookies to serve ads on seo-tips-blogger.blogspot.com.

    .:: Google's use of the DART cookie enables it to serve ads to your users based on their visit to seo-tips-blogger.blogspot.com and other sites on the Internet.

    .:: Users may opt out of the use of the DART cookie by visiting the Google ad and content network privacy policy at the following URL - http://www.google.com/privacy_ads.html


    Some of our advertising partners may use cookies and web beacons on our site. Our advertising partners include .......
    Google Adsense


    These third-party ad servers or ad networks use technology to the advertisements and links that appear on seo-tips-blogger.blogspot.com send directly to your browsers. They automatically receive your IP address when this occurs. Other technologies ( such as cookies, JavaScript, or Web Beacons ) may also be used by the third-party ad networks to measure the effectiveness of their advertisements and / or to personalize the advertising content that you see.


    seo-tips-blogger.blogspot.com has no access to or control over these cookies that are used by third-party advertisers.


    You should consult the respective privacy policies of these third-party ad servers for more detailed information on their practices as well as for instructions about how to opt-out of certain practices. seo-tips-blogger.blogspot.com's privacy policy does not apply to, and we cannot control the activities of, such other advertisers or web sites.


    If you wish to disable cookies, you may do so through your individual browser options. More detailed information about cookie management with specific web browsers can be found at the browsers' respective websites.

    Related tutorials:

    How to back up blogger

    August 10, 2009

    Back up your blog before any to make any changings in the code of your template or when before you want to edit your posts. Back up your blog regulary to avoid data losing.
    1. How to back up your blog:

    Go to your blogger dashboard and click on Setting , click on the Export blog link.
    back up
    Click on the DOWNLOAD BLOG button and save the XML file. With this your template , your posts and comments will be saved.
    2. How to back up your template:
    Go to your blogger dashboard , click on Layout , Edit HTML. There is a link: Download Full Template , click on it and save your template XML file. Every time when you want to change something in your template first download the XML file and if something goes wrong just uplod your template by clicking on the Browse... , select the XML file and click on the Upload button.
    The second way to back up your template is to copy and paste your template code in any text editor like Notepad and save it in a .txt file. If something goes wrong when you work on your template just replace the entire code with the code saved in the .txt file.
    3. How to back up your posts
    You can back up your posts easily by using the BlogSend feature. To use it go to Settings , Email&Mobile , your posts will be sended to a given email adress so if you accidentaly delete one you can back up it from your email adress. Type your email adress in the BlogSend Adress textfield and click on the SAVE SETTINGS button.
    Related tutorials:

    Ads inside posts without ads between posts

    August 06, 2009

    First please read my previous posts about placing the adsense ads:
    How to insert adsense ads between posts
    Adsense ads inside blogger posts

    Why remove ads between posts?
    My reason to remove the them is the maximum number of 3 ads on a single page, the main page of the blog is the most visited page so better place those 3 ads more wiser.
    Here is a way to remove the ads placed between posts without to remove the ads placed inside posts.


    1. Go to Layout , Edit HTML , check the Expand Widget Templates checkbox

    2. Find the following code in your template:

    <b:if cond='data:post.includeAd'> <data:adEnd/>
    <data:adCode/> <data:adStart/> </b:if>


    3. Replace it with one of the following codes:
    Probably you have noticed that if you use ads between posts the ads are visible at the bottom of the post pages under the comments, to remove these ads ,too replace the above code with the following one:adsense ads

    <b:if cond='data:blog.url ==
    &quot;http://seo-tips-blogger.blogspot.com/kaka.html&quot;'>
    <b:if cond='data:post.includeAd'> <data:adEnd/>
    <data:adCode/> <data:adStart/> </b:if>
    </b:if>
    If you want to keep that ad at the bottom of post pages use the following code:
    <b:if cond='data:blog.pageType != "item"'>
    <b:if cond='data:post.includeAd'> <data:adEnd/>
    <data:adCode/> <data:adStart/> </b:if>
    </b:if>
    3. Save your template!
    Related tutorials:

    Adsense ads inside blogger posts

    August 04, 2009

    adsense ads inside postsAds inside posts have a higher CTR , higher CTR means more money. Wrapping adsense code is violating the adsense TOS, here is a way to place the ads without violating the TOS.


    1. First of all place ads between posts

    2. Go to Layout , Edit HTML and check the Expand Widget Templates checkbox

    3. Find the line <data:post.body/>

    • If you want to place the ads right under the posts title copy the following code before the above code line
    • If you want to place the ads at the end of your posts copy the following code after the above code line

    The code:

    <b:if cond='data:blog.pageType == "item"'>
    <b:if cond='data:post.includeAd'> <data:adEnd/>
    <data:adCode/> <data:adStart/> </b:if>
    </b:if>

    4. Save your template.
    Related tutorials:

    How to insert adsense ads between posts

    August 02, 2009

    The ads between posts usually have low CTR (small number of clicks), but this is the easiest way to place ads on your blog. It`s very simple to insert adsense ads between posts , just complete the following steps:


    1. Login to your Blogger dashboard

    2. Go to Layout , Page Elements

    3. Click on the Edit link on the Blog Posts boxadsense ads between posts
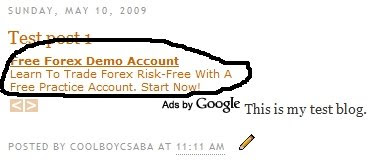
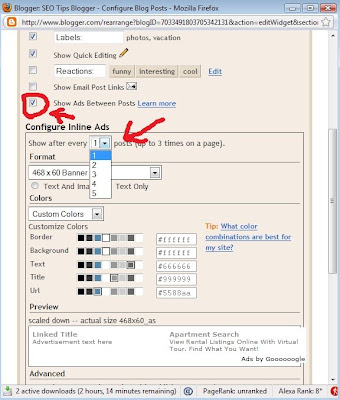
    4. Check the Show Ads Between Posts checkbox and select the number of ads to show.adsense
    NOTE: Don`t forget the maximum number of adsense ads in a single page is 3.

    5. Click on the save button and read my post about ads inside posts
    Related tutorials: