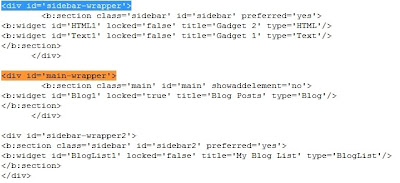
Now let`s start , we need to edit the code of the template so:
1. Go to Layout >>> Edit HTML
2. Find the following code:
<div id='sidebar-wrapper'><b:section class='sidebar' id='sidebar' preferred='yes'><b:widget id='HTML1' locked='false' title='Gadget 2' type='HTML'/><b:widget id='Text1' locked='false' title='Gadget 1' type='Text'/></b:section></div>
3. Find the following code:
4. Cut and Paste the code from step #2 right before the code from step #3, it will look like this just you may have other gadgets:<div id='main-wrapper'> <b:section class='main' id='main' showaddelement='no'> <b:widget id='Blog1' locked='true' title='Blog Posts' type='Blog'/> </b:section> </div>

5. Now we need to edit the CSS code of the template:
Find the following code:
Your code may have different width so look for the code what i have marked with blue. Change the red marked code from $endSide to $startSide#sidebar-wrapper { width: 220px; float: $endSide; word-wrap: break-word; overflow: hidden; }
6. Save your template


7 comments:
That totally worked! Thank you so much for responding to my questions. You really do a great job at simplifying the steps. You make dealing with HTML's less intimidating. I will put a link to your site on my blog next Tuesday.
Thanks Nori for the link and if you have another questions just Ask me
your the BEST!!!!!!!!!!!!!!!!!!
I was able to produce a side bar with your instructions. It made an amateur blogger(me) feel like a real coder :)
super awesome explanation. That was about the 5th one I tried and the only one that worked! THANK YOU!
Trying your second side bar HTML and all is working except the second side bar starts after the main wrapper ends. What am I doing wrong?
ANswered my own question...thanks.
Post a Comment