Go back to surfing session

Subscribe to our feed!
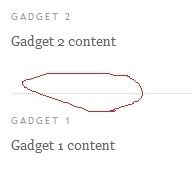
First of all do you know what i am talking about?
I am talking about the separator line between gadgets , that dotted line what i have circled with red.
That line was using to many space of my template so i have removed. It`s simple to remove it , here is how to:


1. Go to Layout , Edit HTML

2. Find the following code(With firefox press CTRL+F and tipe .sidebar or other piece of the code):
.sidebar .widget, .main .widget {
border-bottom:1px dotted $bordercolor;
margin:0 0 1.5em;
padding:0 0 1.5em;
}
3. Change the red highlighted number to 0 so it will look like this:
.sidebar .widget, .main .widget {
border-bottom:0px dotted $bordercolor;
margin:0 0 0;
padding:0 0 0;
}
NOTE: if you have more sidebars search for the following code too:
.sidebar2 or 3 .widget, .main .widget {
border-bottom:1px dotted $bordercolor;
margin:0 0 1.5em;
padding:0 0 1.5em;
}
4. Save your template.
Related tutorials:
Create your own 3 column blogger template by adding a second sidebar to your blogspot blog, you can place the sidebar in any side of the blog.
By adding a second sidebar to blogger (blogspot) your blog will look more professional and you will have more space for your gadgets and widgets. Follow the bellow steps with attention , and first of all backup your template.

1. Go to your Blogger dashboard
2. Layout
3. Edit HTML
4. Find the sidebar-wrapper code, it looks like this:
#sidebar-wrapper { width: 220px; float: $endSide; word-wrap: break-word; /* fix
for long text breaking sidebar float in IE
*/ overflow: hidden; /* fix for
long non-text content breaking IE
sidebar float */}
5. Add the following code right after it:
#sidebar-wrapper2 { width: 220px; float: $endSide; word-wrap: break-word; /* fix
for long text breaking sidebar float in IE
*/ overflow: hidden; /* fix for
long non-text content breaking IE
sidebar float */}
So it will look like this:
blogger blogspot sidebars
6. Find the following code:
<div id='sidebar-wrapper'>
<b:section class='sidebar'
id='sidebar' preferred='yes'>

<b:widget id='BlogList1'
locked='false' title='My Blog List' type='BlogList'/>
<b:widget
id='Label1' locked='false' title='Labels'
type='Label'/>
<b:widget id='Followers1' locked='false'
title='Followers' type='Followers'/>
<b:widget
id='BlogArchive1' locked='false' title='Blog Archive'
type='BlogArchive'/>
<b:widget id='Profile1'
locked='false'
title='About Me'
type='Profile'/>
</b:section>
</div>
Note: Look for the piece of code what i have marked in red, the middle of
the code is containig the first sidebar gadgets
7. Paste after it the following code:
<div id='sidebar-wrapper2'>
<b:section
class='sidebar' id='sidebar2' preferred='yes'>
</b:section>
</div>
It will look like this, but you have other gadgets: seo-tips-blogger blogspot sidebars
8. Now edit the size of the template:
Find the following code :
#sidebar-wrapper {
width: 220px;
float: $endSide;
word-wrap:
break-word; /* fix for long text breaking sidebar float in IE */
overflow:
hidden; /* fix for long non-text content breaking IE sidebar float
*/
}
#sidebar-wrapper2 {
width: 220px;
float:
$endSide;
word-wrap: break-word; /* fix for long text breaking sidebar float
in IE */
overflow: hidden; /* fix for long non-text content breaking IE
sidebar float */
}
The bold numbers are the size of the 2 sidebars , this is the standard
size , but you can change them.

Note: If you have the size of the sidebars we need to calculate:
This is the size of the blog:

#outer-wrapper {
width: 660px;
margin:0 auto;
padding:10px;
text-align:$startSide;
font: $bodyfont;
}

This is the size of the header:

#header-wrapper {
width:660px;
margin:0 auto 10px;
border:1px solid $bordercolor;
}

And this is the size of the posts:

#main-wrapper {
width: 410px;
float: $startSide;
word-wrap: break-word; /* fix for long text breaking sidebar float in IE */
overflow: hidden; /* fix for long non-text content breaking IE sidebar float */
}

These are the default sizes, now lets change them.

The posts body size is 410 , the size of a single sidebar is 220.The entire blog size is 660, the header is the same.

outer-wrapper = 660
main-wrapper = 410
sidebar-wrapper = 220
paddings and borders = 660 - (410 + 220)
Now add the second sidebar:

outer-wrapper = 410 + 220 + 220 + 30 = 880
So edit the outer and the header wrapper to 880
If you use other numbers recalculate it, it`s simple.
9. Save your template and go to Page Elements If you have followed all the steps it will look like in this picture.2 sidebars
10. Now just add some gadgets and please link to us! (Link to us with a text link or use the image code from my sidebar :D thx for your support)
Please also read my new post about how to place one of the sidebars to the other side !
Related tutorials:

Optimize posts title with H1 headings

July 25, 2009

headings h1 h2 h3 h4 h5 h6 seo tips bloggerHeadings are defining the size of the the text. H1 is the biggest and H6 the smallest one. The headings are important from SEO perspective, too. Search Engines like Google give more importance for H1 text, the mort important keywords are in the title of the posts so we need to use H1 for them.( The post title size is set by default to H2 or H3.) Here is how to:


1. Find the following code in your template:
<b:if cond='data:post.title'> <h3 class='post-title entry-title'> <b:if cond='data:post.link'> <a expr:href='data:post.link'><data:post.title/></a> <b:else/> <b:if cond='data:post.url'> <a expr:href='data:post.url'><data:post.title/></a> <b:else/> <data:post.title/> </b:if> </b:if> </h3> </b:if>
(some templates have h2 , change the red numbers to 2 and search again)

2. After finding the above code change the red h2 or h3 tags to h1

3. If you think the H1 is too big add this CSS code before ]]></b:skin>
h1.post-title, .post h1 #Blog1 h1, #Blog2
h1 { font-size:1.5em; }
(this is the size what i am using , but you can change it)

4. Save your template!
Please read my other post about optimizing the posts title tag!
Related tutorials:

Cool and usefull gadgets / addons

July 19, 2009

This post is not about SEO , it`s about the gadgets what makes our work easier. I show here the list of the gadgets / addons what I use. These are free so don`t worry.


adsense reportsAdsense Reports - this is a gadget for Windows Sidebar ,if you have Windows XP download the Windows Sidebar here (it`s included in Windows Vista so you already have it). This gadget shows the adsense earnings , click and pageviews so you need no more to log on to your adsense account to view your stats. Download the Adsense Reports gadget here. Install it and set it up!


online visitors counterWhos.amung.us Online Visitors Counter addon - This is an Addon for Firefox and it can be used only if you use the whos.amung.us widget , this shows the number of the online visitors on your blog/website in real time even if your are on an another website. Download the addon here and follow these steps: add to firefox > install > restart firefox >tools >add-ons >extensions > options >go to your blog/website and click on your whos.amung.us online visitors counter widget and check out the URL of the stats page. Copy the last characters of it e.g: Mine is http://whos.amung.us/stats/t9iqbs4fmyyh/ so i copy the t9iqbs4fmyyh characters. Paste the characters in the sitekat line on the Add-ons window
Finaly click on OK

search statusSearchStatus - Display the Google PageRank, Alexa rank, Compete ranking and SEOmoz Linkscape mozRank anywhere in your browser, along with fast keyword density analyser, keyword/nofollow highlighting, backward/related links, Alexa info and more.
Download it from here , the installation steps are allmost the same as at the whos.amung.us addon. After installed click on the @ icon and customize it.
Related tutorials:

Definitions

July 10, 2009

These days i was wondering what are meaning the short words like URL or HTML and i had do some research and i have found the popular ones definition and i want to share it cause i think it`s interesting:

URL - Uniform Resource Locator
SERP - Search Engine Results Page
PR - Pagerank
SEO - Search engine optimization
SEM - Search Engine Marketing
RSS - Really Simple Syndication or Rich Site Summary
Page impressions - the numberof times your adsense ads where loaded
CTR - Click thru rate - the ratio of impressions and click in % e.g: if you have 2 impressions and 1 clicks your CTR is 50%
eCPM - Effective Cost Per Thousand Impressions (Total earnings/impressions x 1000 = eCPM)
HTML - Hypertext Mark-up Language
CSS - Cascading Style Sheet
xml - Extensible Markup Language
pdf - Portable Document Format
XHTML - Extensible Hypertext Mark-up Language
CPC - Cost per click Through
CPM - Cost Per Thousand
Related tutorials:

Back to top HTML button

July 06, 2009

A "back to top HTML arrow or button" is a little arrow ,a little image button, usually placed in the left bottom corner of the page. When the back to top image/arrow is clicked the page is scrolling (jumping) to the top. This is very useful for your visitors so they can navigate on your blog easier. To add a back to top html button/arrow just follow the steps bellow:

1. Go to your blogger dashboard
2. Go to Layout
3. Click Edit HTML
4. Find the <body> line
5. Add imediatly after it the following code
<div class='backtotop'><a class='backtotop' href='#' rel='nofollow' style='display:scroll;position:fixed;bottom:5px;right:5px;' title='Back to Top'><img height='20' src='http://i645.photobucket.com/albums/uu178/coolboycsaba/up.gif' alt='back to top html arrow button' style='border:0;' width='20'/></a></div>
6. Customize the code:
  • change the red highlighted numbers to change the distance between the side or bottom of the screen
  • change bottom with top to put the buttom at the top of the page
  • change right with left to put the button at the left side of the screen
  • change the bold text(URL) with the URL of your image (you can use my image if you link to my blog , see the details at the sidebar)
  • change the width and the height of the image
7. Save your template!
Related tutorials:

SEO friendly images

July 03, 2009

Search Engines like Google , Yahoo , MSN are checking the images , not only the text of your page but the search engines can`t see the content of your images, they just check the HTML code of the image. Read these steps and optimize your images for a better SEO!

1. To have SEO friendly images use your keywords in the image filename. Don`t use filenames like: 001.jpg or 2009-01-01.jpg Use relevant keywords for your page in the filename: keyword.jpg or keyword1-keyword2.jpg

2. Another important thing is to use the ALT attribute, the alt attribute is the description of the image, like at the filename write a short description including the most relevant keywords.

3. The title tag is the title of the image, use 2, 3 relevant keywords for the title, like at the ALT attribute

The HTML code of a SEO friendly image will look like this:
<img src='http://your-URL.com/keyword1-keyword2.jpg' alt='your keywords' title='your keywords' width='100' height='100'/>
Note: Don`t stuff your ALT or Title tag with too many keywords , use just 2-3 relevant keywords.
Related tutorials: