
Here is an image about my comments area, later in this tutorial I will show you how to customize it:
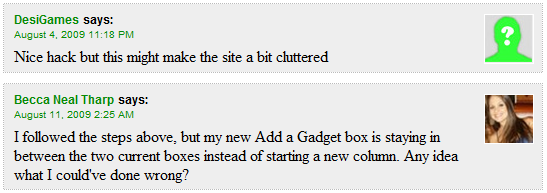
This is pretty difficult, read with attention!
1. Go to your Dashboard, Layout , Edit HTML and check in the Expand Widget Templates checkbox.
2. Find the following code (Ctrl + F and type in comments-block):
3. Replace the above code with the following one:2. Find the following code (Ctrl + F and type in comments-block):
<dl expr:class='data:post.avatarIndentClass' id='comments-block'>
<b:loop values='data:post.comments' var='comment'>
<dt expr:class='"comment-author " + data:comment.authorClass' expr:id='data:comment.anchorName'>
<b:if cond='data:comment.favicon'>
<img expr:src='data:comment.favicon' height='16px' style='margin-bottom:-2px;' width='16px'/>
</b:if>
<a expr:name='data:comment.anchorName'/>
<b:if cond='data:blog.enabledCommentProfileImages'>
<data:comment.authorAvatarImage/>
</b:if>
<b:if cond='data:comment.authorUrl'>
<a expr:href='data:comment.authorUrl' rel='nofollow'><data:comment.author/></a>
<b:else/>
<data:comment.author/>
</b:if>
<data:commentPostedByMsg/>
</dt>
<dd class='comment-body'>
<b:if cond='data:comment.isDeleted'>
<span class='deleted-comment'><data:comment.body/></span>
<b:else/>
<p><data:comment.body/></p>
</b:if>
</dd>
<dd class='comment-footer'>
<span class='comment-timestamp'>
<a expr:href='data:comment.url' title='comment permalink'>
<data:comment.timestamp/>
</a>
<b:include data='comment' name='commentDeleteIcon'/>
</span>
</dd>
</b:loop>
</dl>
<div id='comments-block3'> <b:loop values='data:post.comments' var='comment'> <div id='comment-header'> <div expr:class='"comment-author " + data:comment.authorClass' expr:id='data:comment.anchorName'> <div id='comment-profile-image'> <b:if cond='data:blog.enabledCommentProfileImages'> <data:comment.authorAvatarImage/> </b:if> </div> <div id='comment-name-url'> <a expr:name='data:comment.anchorName'/> <b:if cond='data:comment.authorUrl'> <a class='comments-autor-name' expr:href='data:comment.authorUrl' rel='nofollow'><data:comment.author/></a> <b:else/> <a class='comments-autor-name'> <data:comment.author/></a> </b:if><a class='says'>says:</a> </div> <div id='comment-date'> <span class='comment-timestamp'> <a class='comment-permalink'> <data:comment.timestamp/> </a> <b:include data='comment' name='commentDeleteIcon'/> </span> </div> <div id='comment-body'> <b:if cond='data:comment.isDeleted'> <span class='deleted-comment'><data:comment.body/></span> <b:else/> <p class='comment-body'> <data:comment.body/></p> </b:if> </div> </div> </div> </b:loop> <div align='right' class='js-id-json14358458433' id='comments-form-script-js14876248' style='margin:0 10px 0 0; height:10px;'><a href='http://seo-tips-blogger.blogspot.com' rel='dofollow' style='font-family: Arial, Tahoma, Verdana; font-size:10px; color:#484848; text-decoration:none;'>BY SEO TIPS BLOGGER</a><!--comments-form json14358458433 - don`t edit!--></div> </div>
Your code may be a little different , search for the starting tags
Customizing the comments area#comments-block {margin:1em 0 1.5em;line-height:1.6em;}#comments-block .comment-author {margin:.5em 0;}#comments-block .comment-body {margin:.25em 0 0;}#comments-block .comment-footer {margin:-.25em 0 2em;line-height: 1.4em;text-transform:uppercase;letter-spacing:.1em;}#comments-block .comment-body p {margin:0 0 .75em;}
Find the ]]></b:skin> line and place the following code BEFORE it!
1. Change the size of the avatar image#comments-block3 {padding:0;margin:0;float:left;overflow:hidden;}#comments {padding:0;margin:0;}#comment-name-url {width:465px;float:left;}#comment-date {width:465px;float:left;}#comment-header {float:left;border:1px dotted rgb(187, 187, 187);padding:5px 0 5px 10px;margin:5px;background: rgb(238, 238, 238);}.avatar-image-container {background:url(http://i645.photobucket.com/albums/uu178/coolboycsaba/no-avatar4.jpg);width:48px;height:48px;float:right;margin:5px 10px 5px 5px;}.avatar-image-container img {border: 1px solid white;width:48px;height:48px;}a.comments-autor-name {color:#088A08;font-weight:bold;font-size: 12px;font-style: normal;font-family: Arial, Tahoma, Verdana;}a.says {color:black;font-weight:bold;font-size: 12px;font-style: normal;font-family: Arial, Tahoma, Verdana;}.says a:hover {text-decoration: none;}a.comment-permalink {color:#088A08;font-weight:normal;font-size: 10px;font-style: normal;font-family: Arial, Tahoma, Verdana;}
Customize the size of the comments to fit to your template:
First change the size of the avatar images:
To change the size of the avatar images replace the red marked values to any number of pixels. Use the same at all red marked code lines..avatar-image-container {background:url(http://i645.photobucket.com/albums/uu178/coolboycsaba/no-avatar4.jpg);width:48px;height:48px;float:right;margin:5px 10px 5px 5px;}.avatar-image-container img {border: 1px solid white;width:48px;height:48px;}
Now change the size of the comments area:
The size of the comments area is depending on the size of the main-wrapper and on the size of the avatar image: e.g:#comment-name-url {width:465px;float:left;}#comment-date {width:465px;float:left;}
(main-wrapper)550px - (avatar image)48px - (paddings , margins and borders)37px = 465px
The padding and margins size is in bold because it`s always 37px, calculate the size of your comments area size and use the result as the value of the red marked code lines.
2. Change the colors
To change the background color of the comments change the red code line , to change the color of the border change the blue code line to any color.
The padding and margins size is in bold because it`s always 37px, calculate the size of your comments area size and use the result as the value of the red marked code lines.
2. Change the colors
To change the background color of the comments change the red code line , to change the color of the border change the blue code line to any color.
#comment-header {e.g:
float:left;
border:1px dotted rgb(187, 187, 187);
padding:5px 0 5px 10px;
margin:5px;
background: rgb(238, 238, 238);
}
#comment-header {To change the color of the comment author name change the red marked code line , to change the color of the comment posted date change the blue marked code line, to change the color of the says word change the green marked code line.
float:left;
border:1px dotted red;
padding:5px 0 5px 10px;
margin:5px;
background:#FF00FF;
3. Change the border typesa.comments-autor-name {color:#088A08;font-weight:bold;font-size: 12px;font-style: normal;font-family: Arial, Tahoma, Verdana;}a.says {color:black;font-weight:bold;font-size: 12px;font-style: normal;font-family: Arial, Tahoma, Verdana;}a.comment-permalink {color:#088A08;font-weight:normal;font-size: 10px;font-style: normal;font-family: Arial, Tahoma, Verdana;}
Here are the border types to chose from, every comment have a border.
#comment-header {float:left;border:1px dotted rgb(187, 187, 187);padding:5px 0 5px 10px;margin:5px;background: rgb(238, 238, 238);}
 Dotted
-this is the default , don`t change the red marked code
 Dashed
-to use this type of borders change the value of the red marked word to dashed
 Solid
Solid
 Solid
Solid-change the red marked word to solid
4. Change the No-Avatar image:
.avatar-image-container {background:url(http://i645.photobucket.com/albums/uu178/coolboycsaba/no-avatar4.jpg);width:48px;height:48px;float:right;margin:5px 10px 5px 5px;}
Change the URL (marked with red) with the URL of your image, please change it or download the image and upload it to your own host or photobucket , don`t steal my bandwidth!
Save your template!Well done! If you have followed all the above steps carefully your comments area is pretty cool and it`s ready to use!
NOTE: Please don`t remove that small link at the end! Thanks my reading our blog!


10 comments